Version: 0.21.0This documentation is for Spitfire 0.21.0.
Test editor
The test editor is where you define what a load test does: which scenarios run, which steps each scenario runs in order, which values are taken from responses and reused in later steps, which checks verify the responses and which thresholds decide whether the run passes or fails. How much load is applied (VU count, request rate, stages) is set on the same screen; the Load model page covers it separately.
This page walks through the editor from top to bottom, in order. The examples use HTTP; the other protocols (gRPC, Kafka, SQL…) share the same step structure and the same extract, check and think time fields.
What it is for
- You define the test without writing code, through form fields; at any time you can see the same definition as JSON, edit it and run it from the CLI.
- Every change is validated on the server as you type: invalid fields are marked in red, and an invalid test cannot be saved.
- The Try it button sends the test to the real system as a single iteration, without applying load, and shows each step's request, response, check results and extracted variables.
- Save stores the test as a new version. Old versions are never deleted; the Version history on the test page shows a diff and can restore any of them.
When to use it
- When creating a new test (Tests → New test).
- When changing an existing test (Edit on the test page).
- When reviewing a test imported from a k6 script, a JMeter plan, OpenAPI/Postman/HAR or a traffic log before saving it (imports open in the editor).
- When a run shows unexpected errors, to inspect a single iteration step by step with Try it before applying load again.
Saving does not start a run. As the editor itself says: "Saving stores the test as a new version; it does not start a run. Start runs from the test page." To start a run, see Runs and results.
Editor layout
From top to bottom the editor has these parts:
| Where | What |
|---|---|
| Top right | Try it (a single iteration) and Save (new test) or Save as new version (existing test) |
| Below the title | A yellow box when there are validation errors: "N errors:" and the paths of the first four |
| Large text box | Test name |
| Tabs | Scenarios & steps, Thresholds (N), General & variables, Environments, Options, JSON |
A tab that contains an error shows a red exclamation icon next to its name; that is how you know which tab to look at.
 Test editor: tabs, scenario buttons, load model and the first step
Step by step creating your first test
The order below is the shortest path from an empty test to a working, saved one.
Go to Tests in the left menu and click New test at the top right (Tests
In Spitfire: /tests). The editor opens with a ready-made skeleton:- Test name: "New test"
- One variable on the General & variables tab:
base=https://example.com - A scenario named
mainwith the Ramping VUs (ramping-vus) load model: up to 10 VUs in 30 seconds, 1 minute at 10 VUs, down to 0 in 10 seconds - An HTTP step named "Home page":
GET {{base}}/with one check: status = 200 - Two thresholds:
p(95)<500onreq_durationandrate<0.01onreq_failed
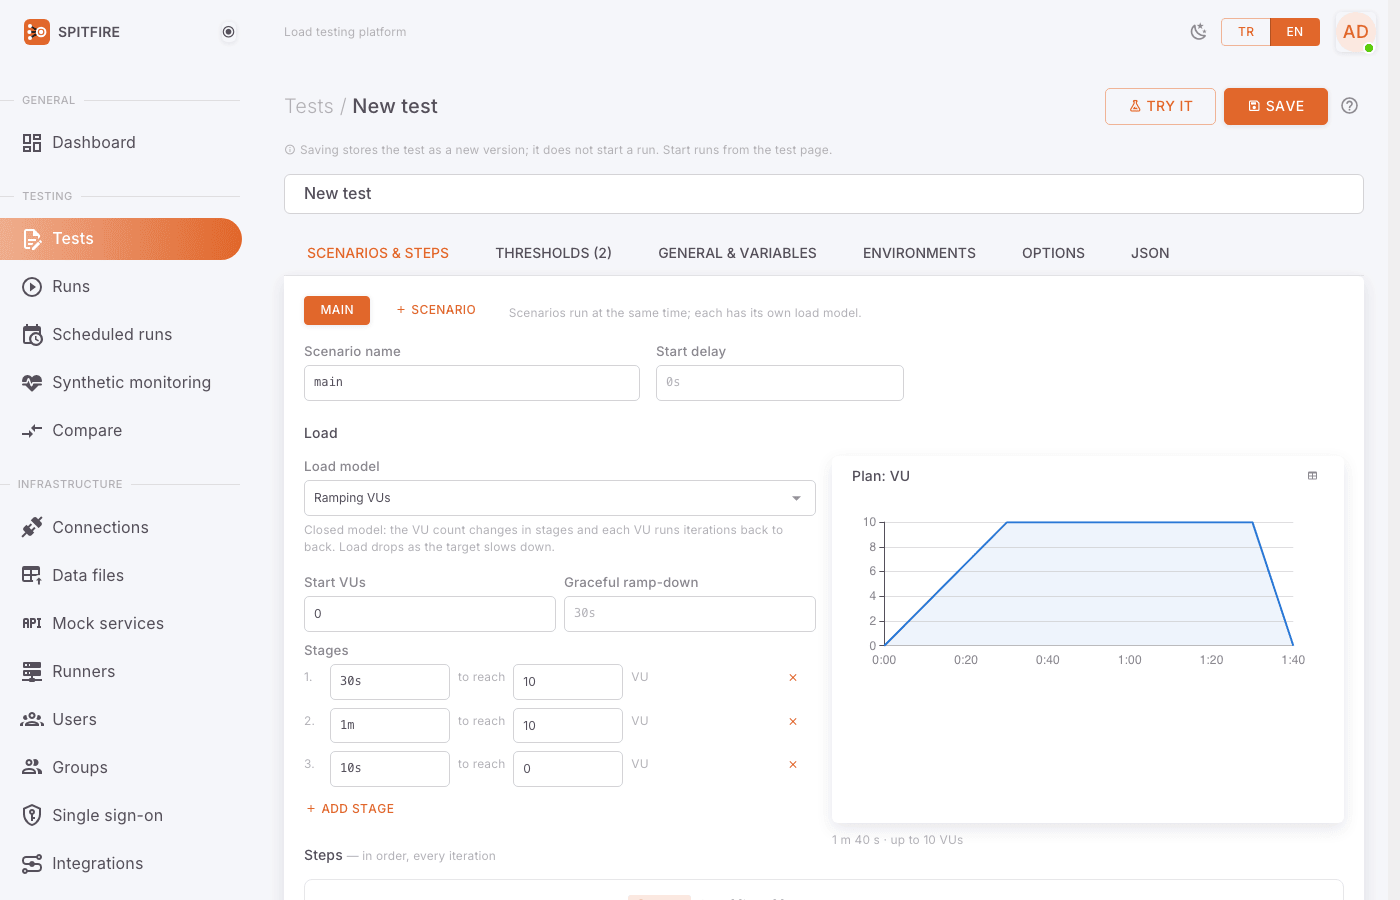 New test: the skeleton the editor opens with
Type a meaningful name in the Test name box at the top (e.g. "Checkout flow"). The name is required; leaving it empty gives the error
name: required.Switch to the General & variables tab. In the Variables section, replace the value of the
basevariable with the address of the system you are testing (e.g.https://shop.staging.example.com). Write it without a trailing/; steps use it as{{base}}/api/....Go back to the Scenarios & steps tab. Under the Load heading, pick the load model and enter its values. If you don't know which model to pick, read Which load model should I pick first. Keep it small for a first try (e.g. 5 VUs, 1 minute).
In the first step card under the Steps heading:
- Type the Step name in the text box at the start of the card (e.g. "Login").
- Leave HTTP selected in the Protocol list.
- Pick the method in the Method list (
GET,POST,PUT,PATCH,DELETE,HEAD,OPTIONS). - Type the address in the URL field:
{{base}}/api/login. - Fill in the Headers, Query and Body sub-tabs if needed (details below, HTTP request).
On the Checks tab at the bottom of the same card, define how you tell that the response is correct ("status = 200" is already there).
If a value from this step's response (e.g. a token) is needed in later steps, switch to the Extract tab and define an extractor with Add variable.
Click Add step for a new step and repeat steps 5–7.
Review the pass/fail criteria on the Thresholds (N) tab (see Defining thresholds).
When there is no yellow error box, click Try it at the top right. In the Try (1 VU, 1 iteration) window, check each step's request, response, checks and extracted values.
If everything is right, click Save. The test is saved and its page opens. You start the run from there with Run.
The Save button is disabled while there are errors. If hovering over Try
it says "Fix the errors first", read the paths in the yellow error box:
scenarios[0].steps[1].request.url means "the URL field of the second step of the
first scenario" (counting starts at 0).
Scenario structure
A test is made of one or more scenarios. At the top of the Scenarios & steps
tab there is a button for each scenario (e.g. main); the selected one is solid blue.
The Scenario button with the plus icon next to them adds a new scenario (named
scenario_2, scenario_3…, with Constant VUs 5 VUs / 1 minute and a single HTTP
step).
Each scenario has its own fields:
| Field | What it does |
|---|---|
| Scenario name | The scenario's name. Only letters, digits and _, not starting with a digit (checkout, browse_catalog). A hyphen (-) is not allowed. Must be unique within the test. |
| Start delay | How long after the run starts this scenario begins (startTime, e.g. 30s). Empty = immediately. |
| Delete scenario | Shown only when there is more than one scenario. |
| Load | This scenario's load model (executor). See Load model. |
| Steps | The steps that run in order in every iteration. |
The hint on screen says it too: "Scenarios run at the same time; each has its own load model." For example, one scenario can represent many users browsing the catalog and a second one a few users checking out.
The iteration: when a VU has run all of a scenario's steps once from top to bottom, one iteration is complete. Then (depending on the load model) it starts another.
Spitfire has no conditional branching (if), loops or step groups. Every iteration runs the scenario's steps from top to bottom in order. Use separate scenarios for different flows, and Run once per VU for work done once (login) (see Think time and once per VU). In tests imported from k6/JMeter, loops and conditions are listed as "not converted" in the conversion report.
Step structure
Each step is a card. Its header row holds, from left to right: the expand/collapse
arrow, the sequence number, the Step name, the protocol badge, a short summary
(METHOD URL for HTTP), the "once" badge if set, and on the right the Move up,
Move down and Delete step buttons. A step with an error gets a red border and an
exclamation icon in its header.
Inside the card:
- The Protocol list: HTTP, WebSocket, Server-Sent Events, gRPC, MQTT, RabbitMQ (AMQP), Kafka, Redis, SQL, MongoDB.
- For protocols other than HTTP, WebSocket and SSE, the Connection list (address and
passwords are not in the step but in a saved connection on the Connections page).
If there is no suitable connection it says "No connection for this protocol." with a
Create a connection
In Spitfire: /connectionslink. For HTTP/WS/SSE, when a saved mTLS connection exists, a Client certificate (mTLS) list shows instead. - The protocol's own form (HTTP below).
- The list of variables you can use: "Use variables as {{name}}: … Built-in: {{__VU}} {{__ITER}} {{$uuid}} {{$randInt 1 100}} {{$timestamp}}" and the expandable Synthetic test data (fake.…) section.
- Three sub-tabs: Checks, Extract, More.
Changing the protocol resets the step's protocol-specific fields to defaults and rebuilds the checks around that protocol's success status ("200", "OK" or "ok"). The step name, extractors and think time are kept.
Every step also has a step id (id). The editor generates it from the step name and
shows it at the bottom of the More tab as "Step id (used by threshold filters)". The
id identifies the step in threshold filters and result tables, and must be unique within
the test. To change it by hand, use the JSON tab.
HTTP request
The HTTP form has these fields:
| Field | Description |
|---|---|
| Method | GET, POST, PUT, PATCH, DELETE, HEAD, OPTIONS. |
| URL | A full address or a template with variables: {{base}}/api/items/{{id}}. A URL without variables must start with http:// or https://. |
| This request changes data on the target | When checked, every run (and Try it) asks for write confirmation first. Non-GET steps imported from an API document come checked. |
| Headers sub-tab | Key/value rows; Add header. Values can be templates (Bearer {{token}}). |
| Query sub-tab | Query parameters added to the URL; Add parameter. |
| Body sub-tab | Body type: None, JSON, XML, Form (urlencoded), Form (multipart / files), Raw. |
Body types:
- JSON / XML / Raw: you type the body in the text area; templates are allowed. When a
JSON body has no
{{…}}, the server also checks that the JSON is valid. - Form (urlencoded): key/value rows with Add field.
- Form (multipart / files): fields with Add part. A part with a File name (for files) is sent as a file; for a binary file tick Value is base64 (binary file) and paste the value as base64.
"Content-Type is set from the body type unless you set it." You don't need to
add Content-Type: application/json for a JSON body.
When an HTTP step counts as "failed" (req_failed): the connection cannot be made, it
times out, or the status code is 400 or above. Exception: if the step has a "Status
= X" or "Status one of X, Y" check, Spitfire treats those codes as expected. For
example, with a check expecting 404, a 404 response does not count in the error rate,
while a 200 does.
 HTTP step: method, URL, Headers / Query / Body and checks
Variables and templates
Most step fields (URL, header and query values, body, gRPC message, Kafka value, SQL
parameters…) are templates: you insert values with {{…}}, and they are computed
again for every request.
Defining test variables
They are defined in the Variables section of the General & variables tab (Add variable). The hint on screen: "Use them in steps as {{name}}. The one place to switch environments (e.g. the base URL)."
- A name may only contain letters, digits and
_and must not start with a digit (base,api_key). - The value is plain text; it is visible in the test definition (and in the JSON and the version history).
- To change a variable's value per environment use Environments; for a single run use Change variables for this run in the Run dialog.
The names a template may use are: test variables, data file columns
({{users.email}}, see Test data) and variables extracted in earlier
steps. Any other name gives the error unknown variable {name}.
Built-in values
| Syntax | Value |
|---|---|
{{__VU}} |
The VU's number (starts at 1, unique across all runners) |
{{__ITER}} |
That VU's iteration counter (starts at 0) |
{{$uuid}} |
A random UUID (v4) |
{{$timestamp}} |
The current time, Unix milliseconds |
{{$isoTimestamp}} |
The current time, RFC 3339 (UTC) |
{{$randInt 1 100}} |
A random integer between 1 and 100 (both included) |
{{$randString 12}} |
12 random letters/digits (0–4096) |
{{fake.tckn}}, {{fake.iban}}, … |
Synthetic Turkish test data; listed on the Test data page |
Expanding Synthetic test data (fake.…) in a step card shows one button per fake data
kind; clicking it copies the {{fake.…}} syntax to the clipboard.
 Built-in values and fake data buttons in a step card
Template rules
- Opening
{{and forgetting to close it with}}:template error: unterminated {{ at offset N. - An unknown
$function ({{$random}}) is a template error. {{$randInt 10 1}}(max < min) is a template error.- A variable without a value (e.g. one whose extractor found nothing) renders as an empty string.
- In SQL, values may not be written into the query text; use the
$1,?,@p1,:1parameters and put the template in the parameter value.
Extracting values
An extractor takes a value from a step's response so later steps can use it as
{{name}}. Typical example: taking the token from the login step.
Step by step:
- In the card of the step that produces the value, click the Extract tab.
- Click Add variable. A row appears.
- Type the variable name in the Variable name box (e.g.
token). - Pick where the value comes from in the Source list.
- Type an expression that fits the source in the Expression box (table below).
- Optionally type a value in the default box to use when nothing is found.
- Use
{{token}}in a later step (e.g. the header valueBearer {{token}}). - Check it with Try it: under the step the try window should show "Extracted: token=…"; when nothing was found it says "Not found: token" in red.
| Source | Expression example | What it takes |
|---|---|---|
| JSONPath | $.data.token, $.items[0].id |
The first match in the JSON body (text as is, numbers as numbers, objects/arrays as compact JSON) |
| XPath (XML) | //token, count(//item) |
The first node's text in the XML body, or the expression's value |
| Regex | id=(\d+) |
The group of the regex's first match in the body (by default group 1 when there is one) |
| Header / metadata | X-Request-Id, Location |
An HTTP header (case-insensitive), gRPC metadata or a message header |
| Status | (empty) | The status: a code such as 200 for HTTP, a name such as OK for gRPC |
 Extract tab: variable name, source, expression and default
Good to know:
- An extracted variable can be used in later steps of the same iteration and in the VU's later iterations. The help line in a step card lists the variables that step can use (only those extracted in earlier steps appear).
- If a value is not found this time, the value from the previous iteration is not reused: the variable falls back to its default, or without one to the test's variable of the same name (or to an empty string). This way an expired token cannot make later requests look successful by mistake.
- Asking for a regex group that does not exist gives
the regex has only N group(s). - Not keeping response bodies (Options → Don't keep response bodies) does not break extractors; steps that read the body are not affected.
Defining checks
A check verifies whether a response is right. The help text on screen states an
important rule: "A failed check doesn't stop the iteration; it counts in the "checks"
rate. Add a threshold to fail the test." So after a failed check the iteration's
remaining steps still run; to turn the test red you put a threshold on the checks
metric (e.g. rate>0.99).
Step by step:
- Click the Checks tab in the step card (it is the tab open by default).
- Click Add check.
- Pick the type in the Check type list.
- For JSON field, XML field or Header, type the path in the Path box.
- Pick the comparison in the Operator list.
- Type the expected value in the Value box. For "one of", separate the values with
commas:
200, 201.
| Check type | Path | Operators | Example |
|---|---|---|---|
| Status | — | =, ≠, <, one of |
= 200; one of 200, 201 |
| Latency (ms) | — | <, ≤ |
< 800 |
| Body contains | — | contains, doesn't contain | contains "orderId" |
| JSON field | $.status |
=, ≠, >, ≥, <, ≤, contains, exists, one of |
$.status = "PAID" |
| XML field (XPath) | /order/total |
=, ≠, >, ≥, <, ≤, contains, exists |
/order/total > 0 |
| Header / metadata | Content-Type |
=, contains, exists |
Content-Type contains json |
| Row count (SQL/Mongo) | — | =, ≠, >, ≥, <, ≤ |
≥ 1 |
The Header type is listed for HTTP, gRPC, AMQP and Kafka steps; Row count only for SQL and MongoDB steps.
A check has a name; left empty, one is generated (status == 200, latency < 800ms,
$.status == PAID). The name shows on the run page's Checks card and is used in
threshold filters.
 Checks tab: check type, path, operator and value
Text you type in the Value box is read as JSON when it can be: 200 is a
number, "200" a string, true a boolean. Comparisons are numeric when both sides are
numbers, otherwise they compare text.
Think time and once per VU
The More tab of a step card has two settings:
- Run once per VU: the step runs only in each VU's first iteration. "For steps like login. Retried in the next iteration if it fails." To count as successful, the request must not fail and all its extractors must find a value. The header shows a "once" badge. Because cookies are kept per VU (the default), the session cookie received at login is sent in later iterations too.
- Think time (pause after the step): how long the VU waits after the step, i.e. the think time. There are two boxes: min (1s) and max (3s). With both filled, the pause is picked at random in that range; with only "min" it is fixed. It imitates real users pausing between pages.
 More tab: once per VU, think time and step id
In closed models (constant-vus, ramping-vus) think time lowers the
request rate per VU. In open models (*-arrival-rate) iterations start on a timetable,
so a long think time needs more VUs; without enough VUs, iterations are dropped. See
Load model.
Environments
The Environments tab lets you run the same test against different environments (staging, production…): "each one replaces some variables' values and the connections the steps use. The environment is chosen when a run or schedule starts."
Step by step:
- First define the variables that change per environment on the General & variables
tab (e.g.
base). An environment can only replace variables the test has. - On the Environments tab click Add environment.
- Type the Environment name: lowercase letters, digits,
-and_, at most 32 characters (staging,prod-eu). - In the Variables section enter the values that differ in this environment. "An empty variable keeps its value from the test."
- In the Connections section, map the saved connections the steps use to their
counterpart in this environment (e.g.
orders-db→orders-db-staging). Only a connection of the same type can be picked. If no step uses a saved connection it says "No step uses a saved connection." - The Equivalence (comparative runs) and Version endpoint (optional) sections are only for comparative (A/B) runs; you can leave them empty for normal runs.
- Save. In the Run dialog the environment appears in Environment and scale → Environment.
 Environments tab: environment name, variable values and connection mapping
In JSON:
"variables": { "base": "https://shop.example.com" },
"environments": {
  "staging": {
    "variables": { "base": "https://shop.staging.example.com" },
    "connections": { "orders-db": "orders-db-staging" }
  }
}Options
The Options tab holds settings that apply to the whole test. The defaults are fine for most tests.
| Setting | Default | When to change it |
|---|---|---|
| Request timeout | 30s |
When the target is slow and responses longer than 30 seconds are normal. A request that exceeds it counts as a "timeout" error. |
| Graceful stop | 30s |
The time given to running iterations to finish when the run is stopped or its time is up. |
| HTTP version | Automatic (HTTP/2 when available) | To force HTTP/1.1 only or HTTP/2. |
| Max redirects | 10 |
0 to never follow redirects. |
| When a runner is lost | Stop the run | Continue with the rest (less load): if a runner drops, the run goes on with less total load. |
| Cookies | Each VU keeps its session (recommended) | Off: only a step's own Cookie header is sent. |
| Failed request samples | On | Off when responses carry data that must not be stored. |
| traceparent header | Off | On to join the system's traces (Backend tab). |
| User-Agent | spitfire/1 |
When the target behaves differently by User-Agent. |
| Skip TLS certificate verification | off | Only for test environments with self-signed certificates. Keep it off in production. |
| Don't keep response bodies | off | For memory at very high load; extractors and body checks are not affected. |
| Never reuse connections | off | Every request opens a new TCP/TLS connection; can exhaust source ports. |
| Close connections between iterations | off | When every iteration must connect like a new user. |
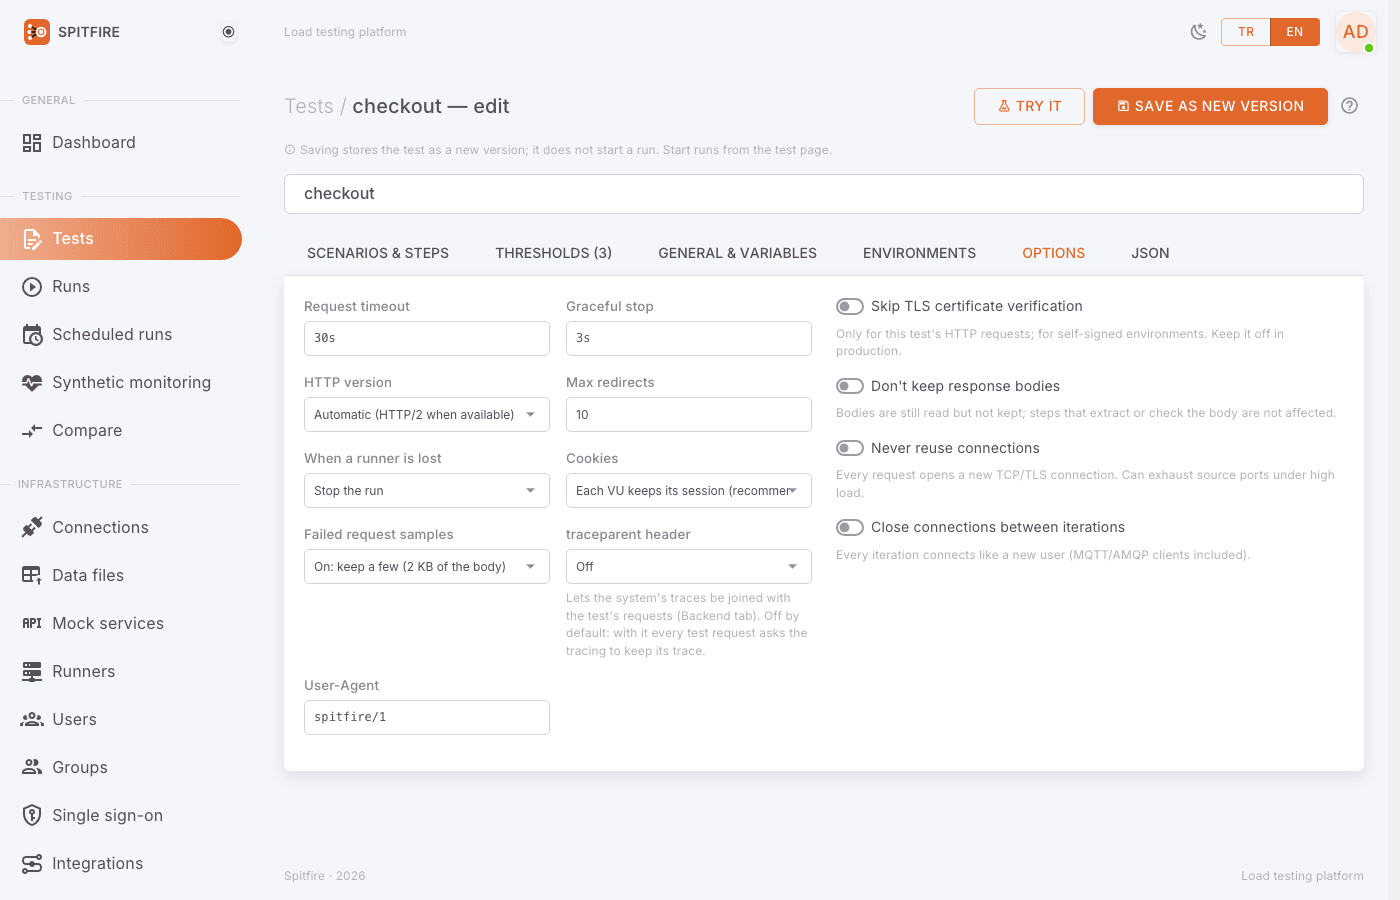 Options tab
Validation and saving
Live validation
Shortly after every change (about 0.6 seconds) the editor has the server validate the definition and redraws the load plan. The result shows in three places:
- The yellow box below the title: "N errors:" with the path and message of the first four.
- Red exclamation icons on the tab names.
- A red message right below the invalid field.
When the test contains operations that change data (This request changes data on the target on an HTTP step, SQL/Mongo writes, dangerous Redis commands) a red box also appears: "This test modifies data. Starting a run or a try asks for confirmation." It is a warning, not an error; the test can be saved.
Saving
- Click Save at the top right (Save as new version for an existing test).
- The test is saved as a new version (v1, v2, …) and its page opens.
- To start a run, click Run on the test page.
If you try to leave the page without saving, the Unsaved changes dialog opens: "This test has changes you have not saved. They are lost if you leave the page." Leave without saving discards them; Cancel returns to the editor.
When two people edit the same test
If someone else saved the same test after you opened the editor, your save is refused: "Someone else saved this test since you opened it. Copy your changes (JSON tab), reload the page and apply them again." In that case:
- Switch to the JSON tab and click Copy (or paste the text somewhere).
- Reload the page; the editor opens with the latest version.
- Make your changes again (or paste the JSON and click Apply; then make sure you are not overwriting the other person's changes).
Version history
Clicking the Version history (current: vN) heading at the bottom of the test page lists every version:
- Diff with current: shows the difference between that version and the current one, line by line.
- Restore this version: saves that version's definition as a new version; history and runs stay as they are. It is refused if the definition no longer passes today's rules (e.g. it uses a deleted connection).
 Version history on the test page
JSON view
The JSON tab shows the whole test: "The whole definition. Edit it and press "Apply";
the form follows. Same format as the CLI: spitfire run test.json".
Step by step:
- Click the JSON tab.
- Edit the text (or paste it from elsewhere).
- Click Apply. Invalid JSON gives "Invalid JSON: …"; JSON without a
scenariosarray gives "a "scenarios" array is required". - The form updates from the JSON; live validation errors show as usual.
- Click Save to save. Apply alone does not save.
The Copy button puts the text on the clipboard. Fields not in the form (e.g. the step
id, the scenario or check filter of a threshold) can only be edited here.
 JSON tab: the whole definition, Apply and Copy
Durations are written as text: "500ms", "30s", "1m30s", "2h". In hand-written
JSON a bare number is read as milliseconds (500 = half a second).
Full example
The test below is a three-step shopping flow: each VU logs in once and takes the token,
lists the products, takes the first product's id and creates an order. You can paste it
into the JSON tab and click Apply (replace the base address with your system's).
{
  "version": 1,
  "name": "Checkout flow",
  "variables": {
    "base": "https://shop.example.com",
    "password": "Test1234!"
  },
  "options": { "timeout": "30s" },
  "scenarios": [
    {
      "name": "checkout",
      "executor": {
        "type": "ramping-vus",
        "startVUs": 0,
        "stages": [
          { "duration": "1m", "target": 20 },
          { "duration": "3m", "target": 20 },
          { "duration": "30s", "target": 0 }
        ]
      },
      "steps": [
        {
          "id": "login",
          "name": "Login",
          "once": true,
          "protocol": "http",
          "request": {
            "method": "POST",
            "url": "{{base}}/api/login",
            "body": {
              "type": "json",
              "content": "{\"email\": \"vu{{__VU}}@example.com\", \"password\": \"{{password}}\"}"
            }
          },
          "extract": [
            { "var": "token", "from": "jsonpath", "expr": "$.token" }
          ],
          "checks": [
            { "type": "status", "op": "eq", "value": 200 },
            { "type": "jsonPath", "path": "$.token", "op": "exists" }
          ]
        },
        {
          "id": "list_products",
          "name": "List products",
          "protocol": "http",
          "request": {
            "method": "GET",
            "url": "{{base}}/api/products",
            "headers": [ { "key": "Authorization", "value": "Bearer {{token}}" } ],
            "query": [ { "key": "page", "value": "{{$randInt 1 5}}" } ]
          },
          "extract": [
            { "var": "productId", "from": "jsonpath", "expr": "$.items[0].id", "default": "1" }
          ],
          "checks": [
            { "type": "status", "op": "eq", "value": 200 },
            { "type": "latency", "op": "lt", "value": 800 }
          ],
          "thinkTime": { "min": "1s", "max": "3s" }
        },
        {
          "id": "create_order",
          "name": "Create order",
          "protocol": "http",
          "request": {
            "method": "POST",
            "url": "{{base}}/api/orders",
            "headers": [
              { "key": "Authorization", "value": "Bearer {{token}}" },
              { "key": "Idempotency-Key", "value": "{{$uuid}}" }
            ],
            "body": {
              "type": "json",
              "content": "{\"productId\": \"{{productId}}\", \"quantity\": 1}"
            },
            "modifiesData": true
          },
          "checks": [
            { "type": "status", "op": "in", "value": [200, 201] },
            { "type": "jsonPath", "path": "$.status", "op": "eq", "value": "CREATED" }
          ]
        }
      ]
    }
  ],
  "thresholds": [
    { "metric": "req_duration", "expr": "p(95)<500" },
    { "metric": "req_failed", "expr": "rate<0.01" },
    { "metric": "req_duration", "filter": { "step": "create_order" }, "expr": "p(95)<800" },
    { "metric": "checks", "expr": "rate>0.99" }
  ]
}
Things to notice in this example:
- The
loginstep has"once": true, so each VU logs in only once; the token is used in all of the VU's iterations. - The
create_orderstep has"modifiesData": true, so starting a run asks for write confirmation. - The third threshold applies only to the
create_orderstep (filter.stepis the step id, not the step name). - If the JSON field names in your system differ (
$.token,$.items[0].id,$.status), look at the real response with Try it and fix the expressions accordingly.
Trying a single iteration with Try it
Try it sends the selected scenario to the real system as 1 VU and 1 iteration, without applying load. The scenario tried is the one selected with the scenario buttons on the Scenarios & steps tab.
- Make sure there is no error box (Try it is disabled while there are errors).
- Select the right scenario.
- Click Try it. If the test changes data, the Try a test that modifies data dialog opens first and lists which operations change data; click I understand, try it to go on.
- In the Try (1 VU, 1 iteration) window, read for each step: status and duration, check results (with the "actual" value when they fail), the Extracted variables, the Not found list, the Request and the Response (headers and body). At the bottom, the Final VU variables are listed.
 Try window: each step's request, response, checks and extracted values
Common problems
| Symptom | Cause | Fix |
|---|---|---|
scenarios[0].name: must be letters, digits or _ and not start with a digit |
The scenario name contains a hyphen, a space or a non-ASCII letter, or starts with a digit. | Write checkout_flow instead of checkout-flow. The same rule applies to variable and extractor names. |
...request.url: must be an absolute http(s) URL |
The URL has no variable and does not start with http:///https://. |
Write the full address, or use {{base}}/path and define base as a full address. |
unknown variable {token} |
The variable is not defined, or it is extracted in a later step. | Define the variable on General & variables, or move the extractor to a step before this one. Check the spelling (case-sensitive). |
template error: unterminated {{ at offset 12 |
A {{ is opened but not closed with }}. |
Fix the template. |
invalid JSON: … (body) |
A comma or quote error in the JSON body. Without {{ in the body the server checks the JSON. |
Fix the JSON; put variables inside quotes in strings: "id": "{{productId}}". |
invalid JSONPath: … |
The expression does not start with $ or has a syntax error. |
Use the $.data.token, $.items[0].id form. |
'in' needs a list |
The operator is one of but a single value is given. | Separate the values with commas: 200, 201. |
operator {op} is not valid here |
An operator that does not fit the check type (e.g. contains for Status). | Pick one of the operators listed for that type in the table. |
duplicate login |
Two steps have the same id, or two scenarios the same name. | Change one of the step ids on the JSON tab. |
a connection is required for {protocol} |
No Connection is selected on a non-HTTP/WS/SSE step. | Pick a connection in the list, or Create a connection. |
| "Not found: token" in Try it | The extractor expression does not match the real response, or the step failed. | Look at the Response body in the try window and fix the expression. |
| The Save button is disabled | There is a validation error. | Follow the yellow box and the red marks on the tabs and fix them. |
| "Someone else saved this test since you opened it…" | Concurrent editing. | Follow When two people edit the same test. |
| There are failed checks but the run "Passed" | Checks don't stop the iteration and don't fail the run on their own. | Add a threshold on the checks metric: rate>0.99. |
Related pages
- Load model: executors, stages, thresholds and capacity tests.
- Test data: CSV data files, fake data and passing values between steps.
- Runs and results: starting a run, watching it live, reading results and reports.
- Tests
In Spitfire: /tests· ConnectionsIn Spitfire: /connections· Data filesIn Spitfire: /data-files